As the world embraces smart technology, automating everyday tasks has become more convenient. One such task is watering plants, which can be time-consuming and easy to forget. Imagine a system that waters your plants on its own, ensuring they stay healthy even when you’re not around. This is where the Automatic Plant Watering Project with Smartphone Control comes in. Using an Arduino, a soil moisture sensor, and a 5V DC pump, this project allows you to water your plants automatically or control the process manually via the RemoteXY app on your smartphone. Let’s dive into how this innovative project works and how you can build your own!
Why Automate Plant Watering?

Watering plants seems like a simple task, but it’s crucial for their survival and growth. Different plants have different watering needs, and overwatering or underwatering can harm them. Automating this process ensures that plants get just the right amount of water, especially when you’re busy or traveling. Plus, being able to control the system remotely gives you the flexibility to water your plants at will.
What is the Automatic Plant Watering System?
This system is a smart setup that uses sensors to detect soil moisture levels and automatically waters the plants when they need it. You can also manually control the system through a smartphone app, allowing you to check moisture levels and activate the water pump anytime.

At the heart of this project is an Arduino microcontroller, which connects to a soil moisture sensor and a 5V DC water pump. When the sensor detects that the soil is dry, the system automatically turns on the water pump to hydrate the plants. The RemoteXY app provides real-time data and manual control, offering both automation and customization.
Components Needed
Arduino Uno

This is the brain of the system, responsible for controlling the entire operation. We will connect the soil moisture sensor to this development board, as well as the 5V DC pump and for remote monitoring and control, the HC-05 Bluetooth Module.
Soil Moisture Sensor Module

This module detects the moisture level in the soil and sends data to the Arduino. We used the resistive soil moisture sensor module type. This type is usually prone to rusting. However, the trick to its long term usage is to always clean it and dry it after use. Which if you think about it, doesn’t really go very well with the whole idea of the project design. To solve this, you can use the capacitive soil moisture module. They are however, tough to work with.
Read Also 10 Arduino-Based Automation Projects You Can Build at Home
5V DC Water Pump

This pumps water to the plants when instructed by the Arduino. The 5V DC pump also allows for the direct use of the Arduino Uno to power it. So sometimes when there is no budget for a Single Channel relay module or high current transistor, the 5V power can be sourced directly from the Arduino 5V pin. Although, we don’t recommend this approach. It should only be adopted as last resort.
Relay Module

Used to control the pump with a low-power signal. You can purchase a copy of this module here at the Smartech online shop. It is very cheap and will save you a lot of hassle during the building process.
Bluetooth Module

This was used for the remote connectivity between the Arduino and the smart phone of the user. You can either use the HC-05 or HC-06 module. Either of them would work if you follow the exact connection detailed in the schematic diagram below.
Power Supply

This module provides power to the pump and the Arduino. You can use a DC jack to direct the power Vcc and GND pins.
RemoteXY App

This allows for smartphone control of the system. This is the app that uses the Bluetooth connectivity to monitor remotely and control the automatic plant watering project design.
Read Also Arduino-Based Robotics Projects: From Beginner to Robotics Genius
Key Features of the System
- Automatic Watering: Waters the plants based on moisture levels, preventing overwatering or underwatering.
- Manual Control: The user can water plants at any time using their smartphone.
- Real-Time Data: The app shows live moisture readings from the soil.
- Low-Cost and Simple: A budget-friendly project that requires minimal components and technical knowledge.
How Does the System Work?
The system operates in two modes: automatic and manual.
Automatic Mode
In this mode, the soil moisture sensor monitors the soil’s moisture level. When the sensor detects that the soil is too dry (below a certain threshold), it sends a signal to the Arduino. The Arduino, in turn, activates the relay module, which powers the 5V DC pump to water the plants. Once the soil moisture reaches the desired level, the pump is automatically turned off.
Manual Mode
In manual mode, the user can open the RemoteXY app on their smartphone and check the current moisture level. If needed, the user can manually trigger the water pump by pressing a button within the app, giving them complete control over when to water the plants.
Step-by-Step Guide to Building the Automatic Plant Watering System
Let’s go through the steps to build your own automatic plant watering system.
The Schematic Diagram

The above circuit diagram shows the connection of the project setup. We added a 1602 LCD module to show the user the soil moisture content for physical monitoring. The app takes care of the remote monitoring.
Set Up the Arduino
First, you’ll need to install the Arduino IDE on your computer and set up the Arduino Uno. Make sure to download the necessary libraries for the soil moisture sensor and RemoteXY.
Connect the Soil Moisture Sensor
Next, connect the soil moisture sensor to the Arduino. The sensor typically has three pins: VCC (power), GND (ground), and SIG (signal). The VCC pin connects to the 5V pin on the Arduino, the GND pin goes to the ground pin, and the SIG pin connects to one of the analog input pins (A0) on the Arduino.
Connect the Relay and Water Pump
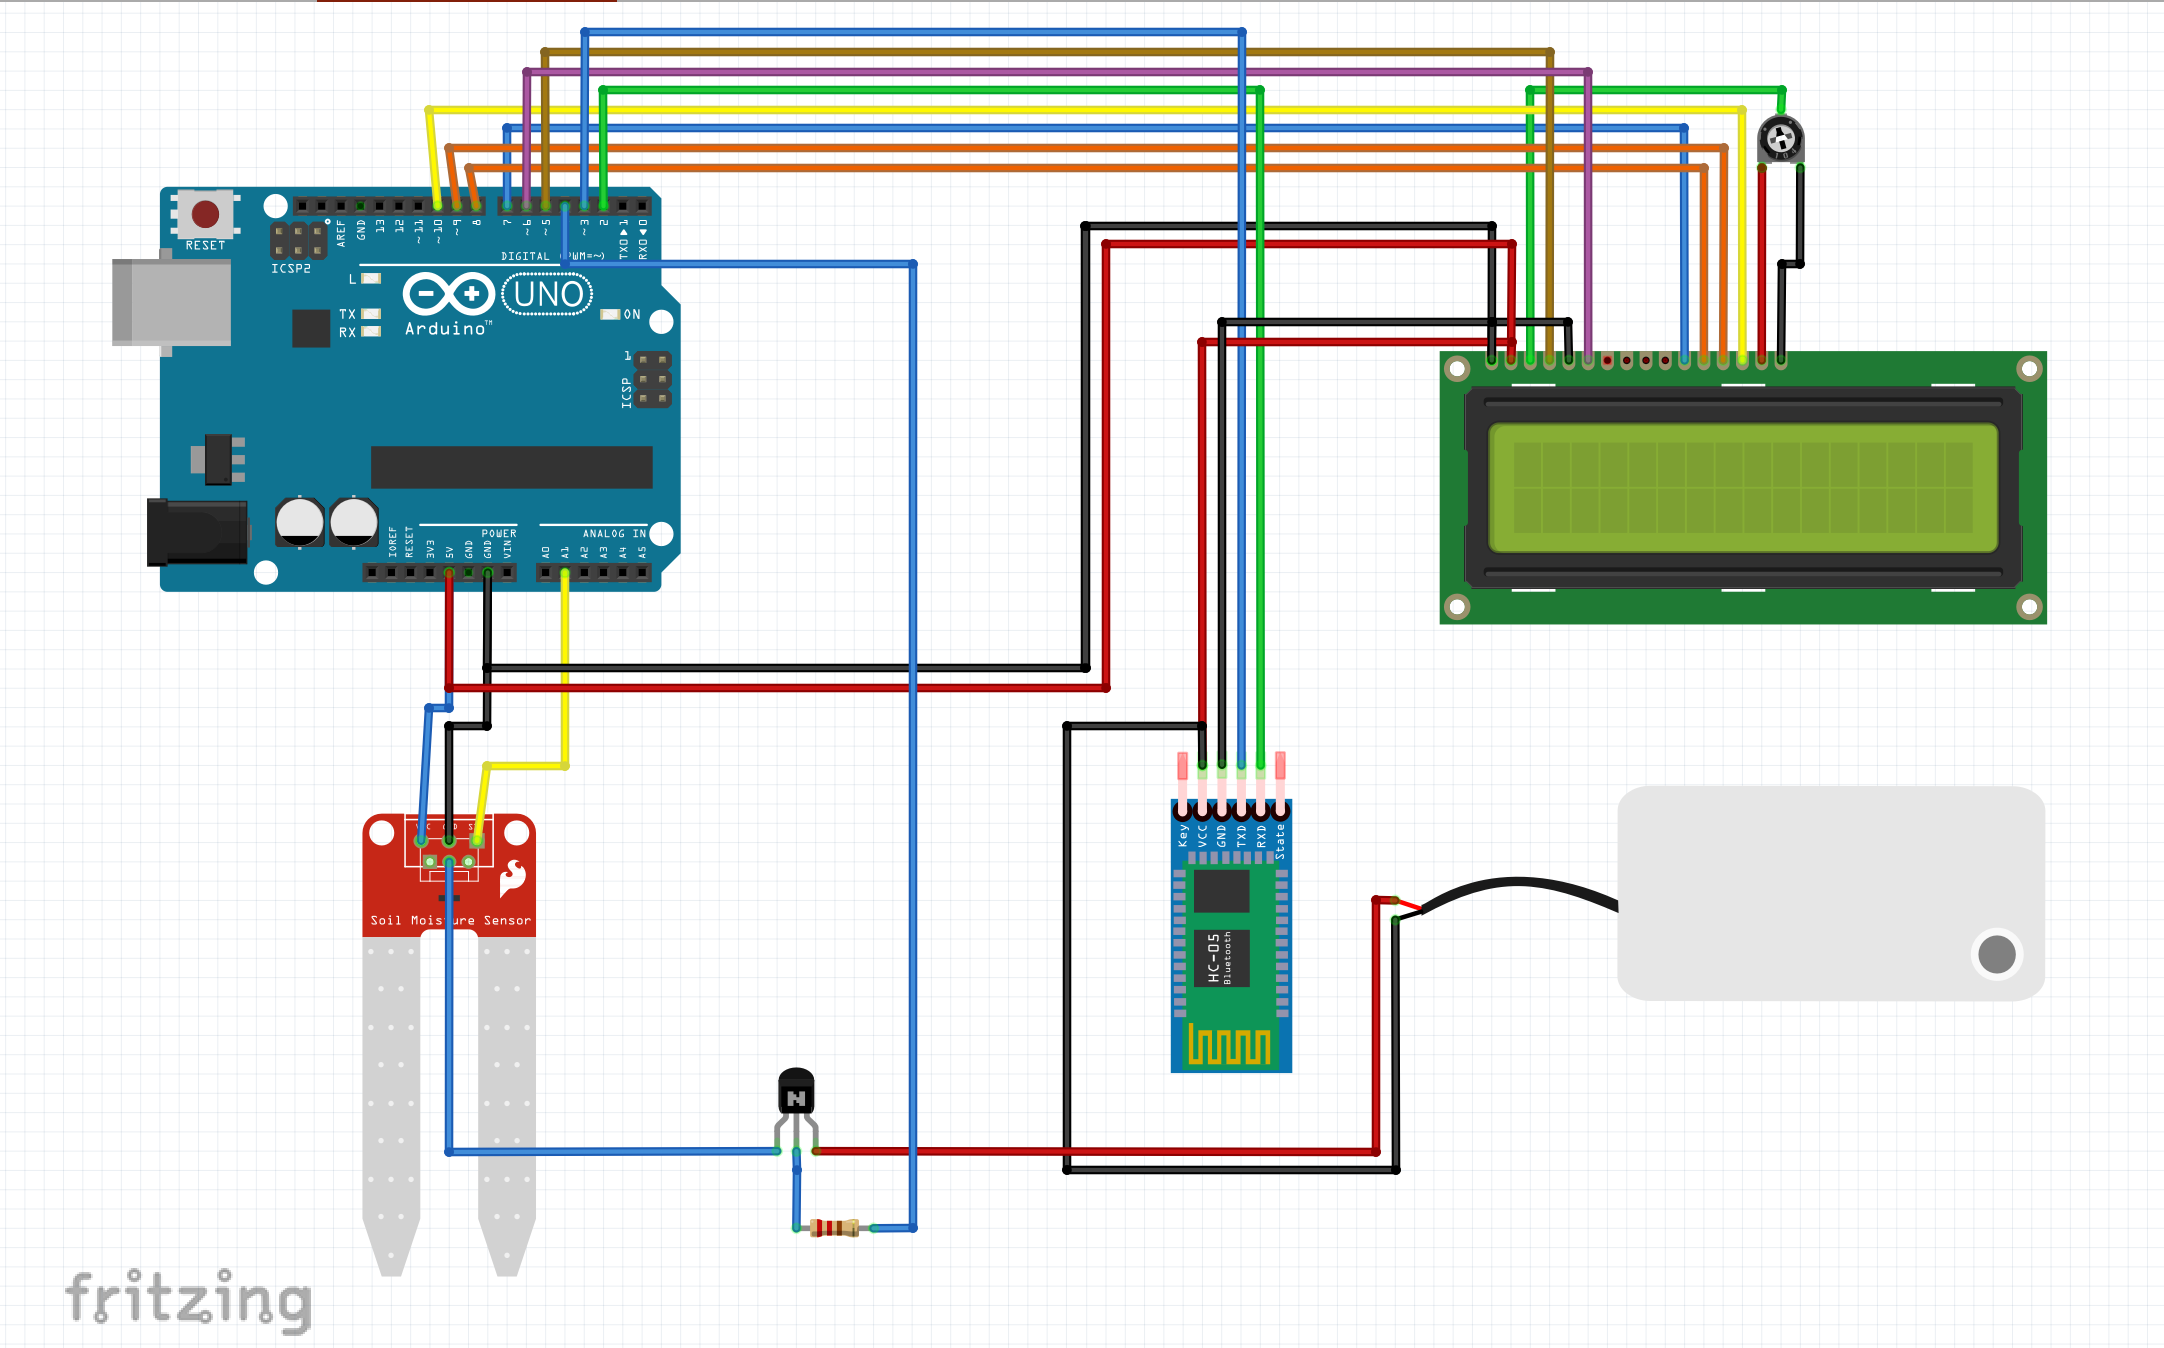
The relay module is used to control the water pump. Connect the VCC and GND pins of the relay to the 5V and ground pins of the Arduino. The IN pin of the relay connects to a digital pin on the Arduino (D7). The pump is powered through the relay, allowing the Arduino to control its activation based on the soil moisture sensor readings.
Programming the Arduino
// you can enable debug logging to Serial at 115200
//#define REMOTEXY__DEBUGLOG

// RemoteXY select connection mode and include library
#define REMOTEXY_MODE__SOFTSERIAL

#include <SoftwareSerial.h>
// include the lcd library
#include <LiquidCrystal.h>

// initialize the library by associating any needed LCD interface pin
// with the arduino pin number it is connected to
const int rs = 5, en = 6, d4 = 7, d5 = 8, d6 = 9, d7 = 10;
LiquidCrystal lcd(rs, en, d4, d5, d6, d7);

// RemoteXY connection settings
#define REMOTEXY_SERIAL_RX 2
#define REMOTEXY_SERIAL_TX 3
#define REMOTEXY_SERIAL_SPEED 9600


#include <RemoteXY.h>

// RemoteXY GUI configuration
#pragma pack(push, 1)
uint8_t RemoteXY_CONF[] =   // 85 bytes
  { 255,1,0,4,0,78,0,19,0,0,0,0,31,2,106,200,200,84,1,1,
  3,0,2,32,91,44,22,60,38,83,9,0,2,26,31,31,79,78,0,79,
  70,70,0,129,8,30,93,12,83,13,39,5,64,17,80,108,97,110,116,32,
  87,97,116,101,114,32,76,101,118,101,108,0,67,34,55,40,10,64,23,75,
  4,77,2,26,2 };

// this structure defines all the variables and events of your control interface
struct {

    // input variables
  uint8_t switch_01; // =1 if switch ON and =0 if OFF

    // output variables
  char value_01[11];

    // other variable
  uint8_t connect_flag;  // =1 if wire connected, else =0

} RemoteXY;
#pragma pack(pop)

#define PIN_SWITCH_01 4
//delre the pin he analog soil moisture is connected
#define analogSensorPin A2
//state where the led is connected
#define ledPin 4

void setup() {
  RemoteXY_Init ();
  //begin serial monitor communication
   Serial.begin(9600);
  // set up the LCD's number of columns and rows:
  lcd.begin(16, 2);

  pinMode (PIN_SWITCH_01, OUTPUT);
}

void loop(){
  RemoteXY_Handler ();
  digitalWrite(PIN_SWITCH_01, (RemoteXY.switch_01==0)?LOW:HIGH);

  int readPin = analogRead(analogSensorPin);
  double readPin1 = map(readPin, 0, 1024, 100.00, 0.00);
  dtostrf(readPin1, 0, 1, RemoteXY.value_01);

  lcd.setCursor(0, 0);
  lcd.print("Soil Moisture");
  lcd.setCursor(0, 1);
  // print the number of seconds since reset:
  lcd.print(readPin1);
  lcd.print("   ");

  Serial.println(readPin1);
  delay(1000);

}
Once all components are connected, you’ll need to write a program to control the system. The code will read the moisture level from the sensor and activate the pump when necessary. You’ll also integrate the RemoteXY app’s code to allow for manual control via your smartphone.
Set Up the RemoteXY App

Download the RemoteXY app on your smartphone and design a simple interface with a button to turn the water pump on or off, and a display to show the current soil moisture level. Once the app is set up, connect it to the Arduino via Bluetooth.
Testing the System Design

Now that everything is set up, test the system by placing the soil moisture sensor in the soil. Observe how the pump responds when the soil dries out and how you can manually control it using the app.
Benefits of the Automatic Plant Watering System
This system offers several advantages over traditional plant watering methods.
Convenience
You don’t have to worry about remembering to water your plants. The system automatically does it for you, making it especially useful if you travel often or have a busy schedule.
Water Conservation
By monitoring the soil moisture levels, the system only waters the plants when needed, preventing water waste.
Remote Monitoring and Control
Using the RemoteXY app, you can monitor the moisture levels and control the watering system from anywhere, giving you peace of mind that your plants are well cared for.
Cost-Effective
This DIY project is inexpensive compared to commercial automatic watering systems. The components are affordable and widely available, making it a great option for hobbyists and gardeners on a budget.
Applications of the Automatic Plant Watering System
This system can be used in a variety of settings, from small indoor plants to outdoor gardens. Whether you’re managing a home garden, a greenhouse, or just a few potted plants on your balcony, this system ensures that your plants get the right amount of water without the need for constant attention.
Home Gardening
Busy individuals can use this system to manage their home gardens, ensuring plants stay healthy even when they’re away.
Greenhouses
In a controlled environment like a greenhouse, the automatic watering system can maintain consistent moisture levels, promoting healthy plant growth.
Potted Plants
For those with small spaces or indoor plants, this system is perfect for ensuring plants are watered without needing daily attention.
Troubleshooting and Maintenance
As with any electronic project, you may encounter a few hiccups along the way. Here are some common issues and how to solve them:
Pump Not Activating
Check the connections between the relay and pump. Make sure the relay module is receiving a signal from the Arduino and that the pump is receiving power.
Incorrect Moisture Readings
If the soil moisture sensor gives inconsistent readings, try recalibrating the sensor. Also, ensure the sensor is properly placed in the soil.
RemoteXY App Not Connecting
Ensure that your smartphone’s Bluetooth is turned on and that it’s properly paired with the Arduino.
Conclusion
The Automatic Plant Watering Project with Smartphone Control offers a smart solution to the age-old problem of keeping plants hydrated. By using simple components like an Arduino, soil moisture sensor, and water pump, you can create a system that takes care of your plants automatically. With the added benefit of smartphone control via the RemoteXY app, this project provides flexibility, convenience, and peace of mind. Whether you’re a tech enthusiast or a gardening hobbyist, this project is a rewarding way to combine technology with nature.
Call to Action
Have you built your own automatic plant watering system? Share your experience or ask any questions in the comments below! If you’re interested in more DIY smart gardening projects, stay tuned for more tutorials and tips.
Frequently Asked Questions
Can this system be used for larger gardens?
Yes, but you may need to scale up the pump and use multiple sensors for larger areas.
What happens if the soil stays wet for too long?
The system will not activate the pump as long as the moisture level is above the threshold, preventing overwatering.
Is it possible to add a Wi-Fi module for remote control?
Yes, you can integrate an ESP8266 or ESP32 module for remote control via Wi-Fi.
How long does the system last before needing maintenance?
The system is fairly low-maintenance. You may need to check the soil moisture sensor occasionally to ensure it isn’t clogged with soil or dirt. The water pump should last a long time if used properly, but it’s a good idea to inspect it every few months for any signs of wear. Battery-powered setups may also require battery replacement depending on usage.
Can this system handle multiple plants at once?
Yes, you can expand the system to water multiple plants. You’ll need to either use multiple soil moisture sensors to monitor different plants or design the layout so that the single pump can distribute water to various locations. Adding additional sensors and valves can help customize it for larger plant collections.
By automating the watering process and incorporating smartphone control, the Automatic Plant Watering Project is an excellent way to ensure your plants thrive without needing constant attention. Whether you’re a tech enthusiast or just want to make gardening easier, this project offers a practical and fun solution!