Are you curious about creating your very own digital thermometer? Whether you’re a DIY enthusiast or just looking for a hands-on project to expand your skills, you’re in for an exciting ride. In this guide, we’ll walk you through building a digital thermometer using the DS18B20 temperature sensor and Arduino Uno to display the room’s temperature on an LCD screen. Plus, we’ll sprinkle in some IoT magic by adding an ESP-01 module to send temperature readings to the Blynk IoT dashboard. Let’s get started!
Why Build a Digital Thermometer?
Why not? Digital thermometers are practical, fun to make, and an excellent introduction to electronics and IoT. Imagine knowing the exact temperature of your room at a glance or monitoring it remotely from your smartphone. It’s not just cool; it’s functional!
What Makes the DS18B20 Special?
The DS18B20 is like the gold standard for temperature sensors. It’s accurate, reliable, and can measure temperatures ranging from -55°C to +125°C. Plus, it communicates using the One-Wire protocol, meaning it only needs one data pin. How convenient is that?
Components You’ll Need
Here’s your shopping list:
- Arduino Uno (DIP) Rev 3
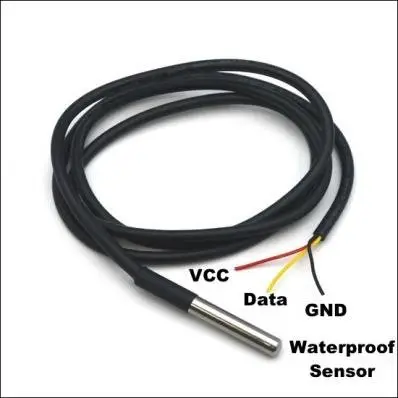
- DS18B20 Waterproof temperature sensor
- 16×2 LCD screen
- I2C module (optional, for simplifying LCD wiring)
- ESP-01 Wi-Fi module
- 4.7k ohm resistor
- Breadboard and jumper wires
- USB cable for programming
Schematic Diagram
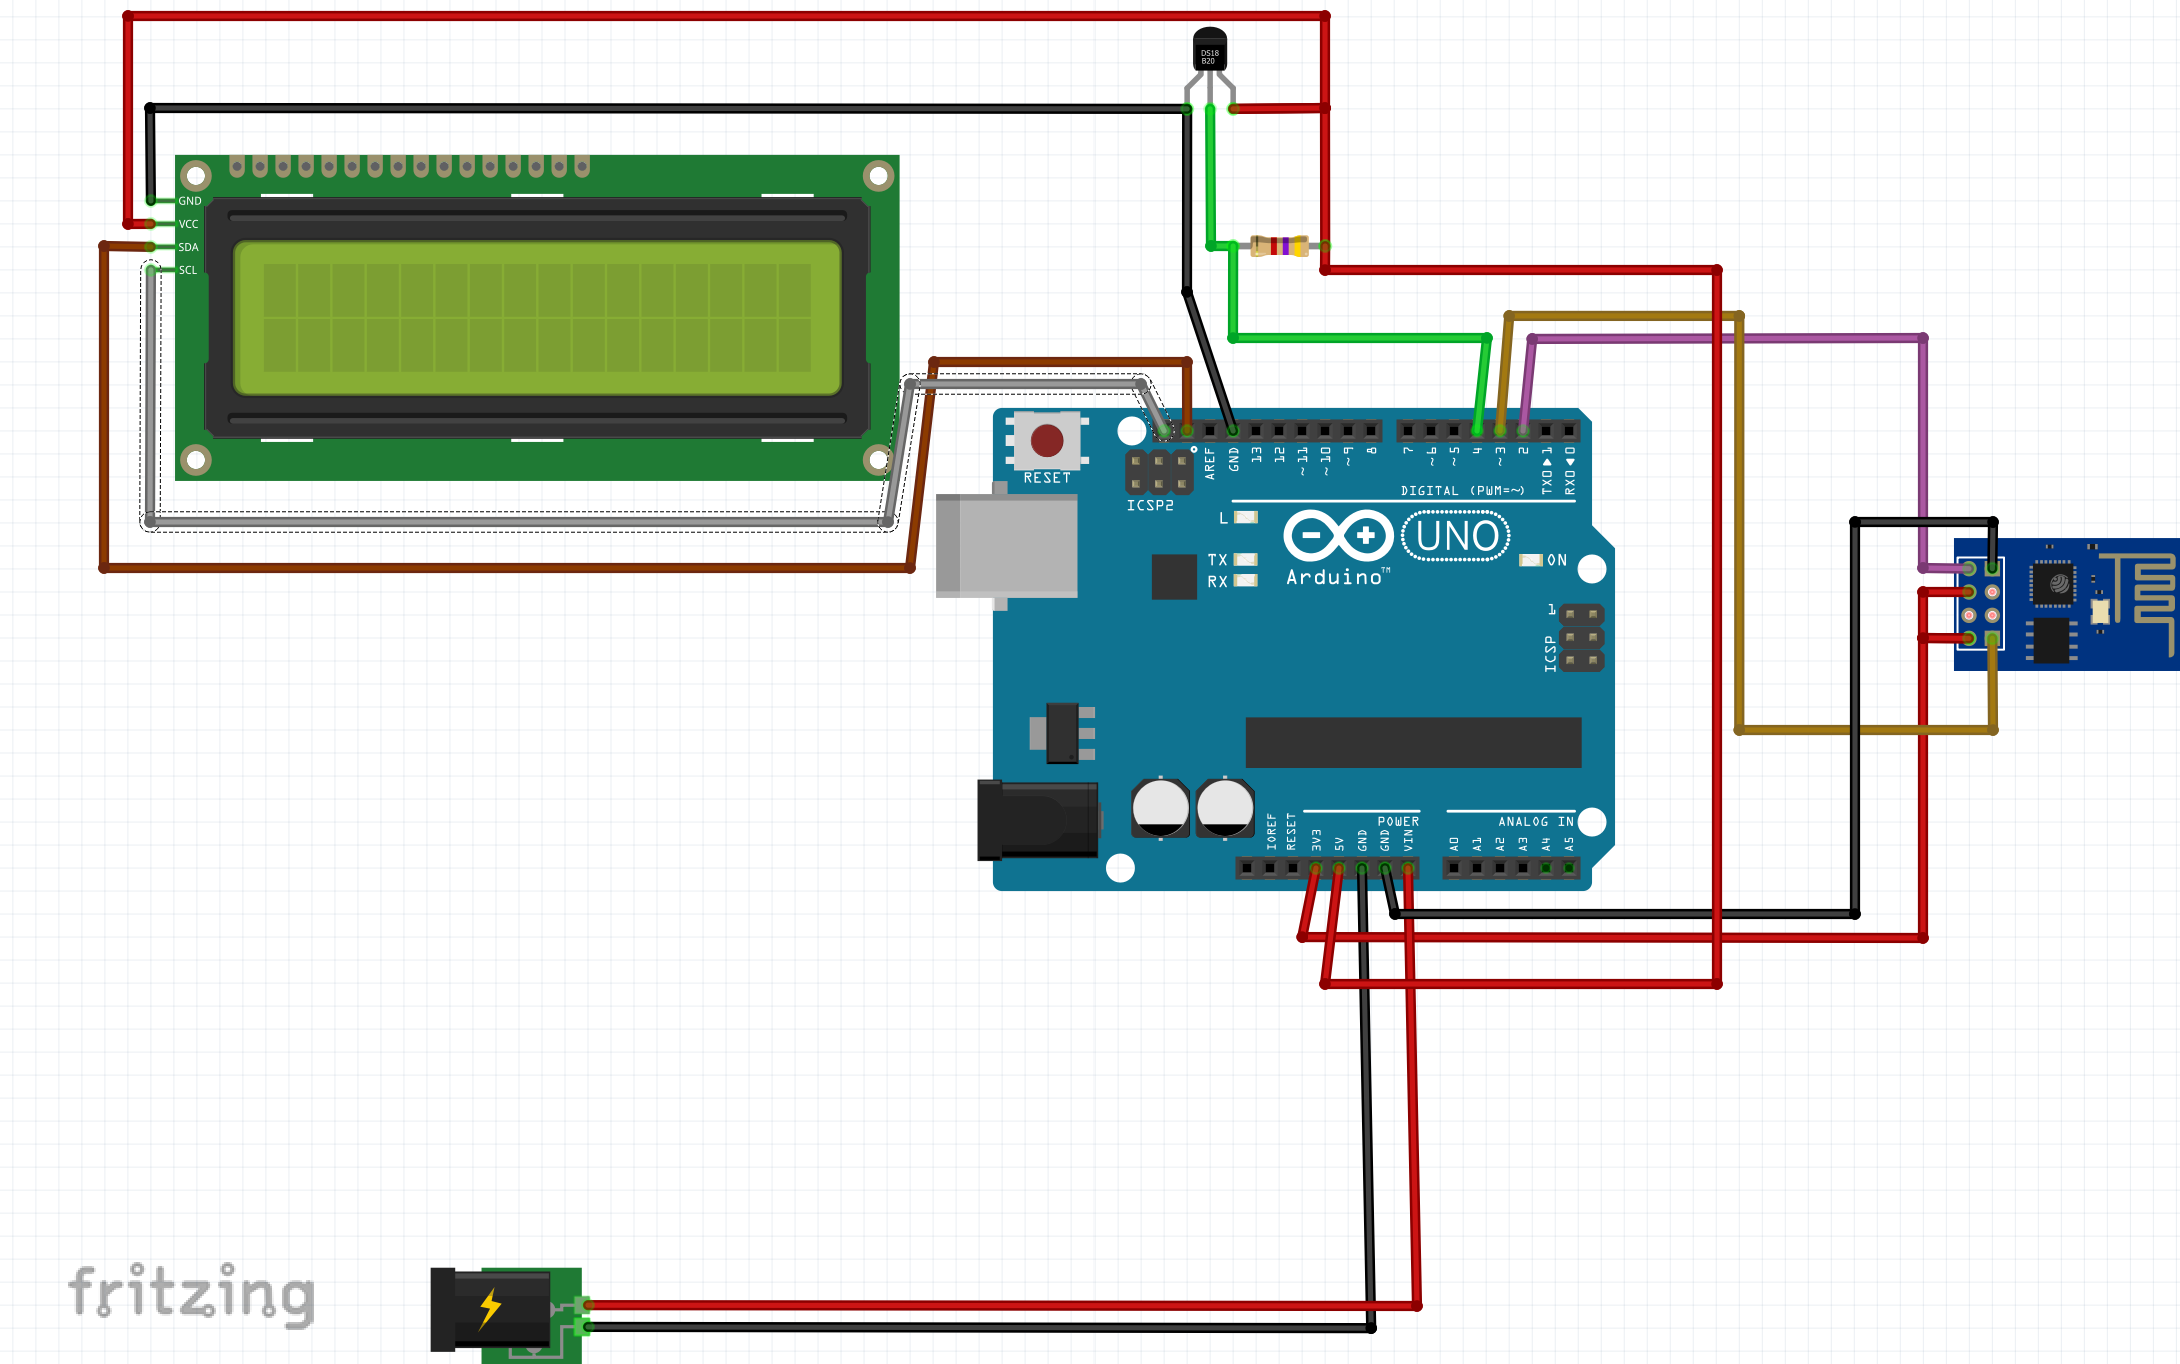
The diagram above is a detailed diagram showing connections for the DS18B20, LCD, and ESP-01 with the Arduino Uno.
Explanation of Schematic Diagram
the circuit diagram shows the connection of the digital temperature sensor to the Arduino uno development board itself. Also the connection the ESP-01 board to the Arduino Uno too. We used a 4.7k-Ohm resistor to connect for the OneWire accuracy resolution.
The LCD connection used the I2C connection protocol and you would need an I2C module to ensure it is connected to the Arduino Uno board. This allows us to use less data wires for the display on the LCD screen. Finally, we sourced an external power supply from a DC power jack as shown above.
Wiring Instructions
Let’s connect the dots:
Connecting the DS18B20:
- Connect the sensor’s VCC to the 5V pin on the Arduino.
- Connect the GND to GND on the Arduino.
- Connect the DATA pin to digital pin 2 on the Arduino.
- Place a 4.7k ohm resistor between the DATA and VCC pins.
Connecting the LCD:
- If using an I2C module, connect:
- VCC to 5V
- GND to GND
- SDA to A4
- SCL to A5
- Without an I2C module:
- Connect pins 1-16 of the LCD to the Arduino according to your module’s documentation.
Connecting the ESP-01:
- Power the ESP-01 with a 3.3V supply (do not use 5V directly!).
- Connect TX to RX and RX to TX on the Arduino.
- Connect CH_PD to 3.3V.
Coding the Thermometer
Fire up the Arduino IDE and let’s get coding!
Basic Code for DS18B20 and LCD
#include <OneWire.h>
#include <DallasTemperature.h>
#include <LiquidCrystal_I2C.h>

#define ONE_WIRE_BUS 2
OneWire oneWire(ONE_WIRE_BUS);
DallasTemperature sensors(&oneWire);
LiquidCrystal_I2C lcd(0x27, 16, 2);

void setup() {
  lcd.init();
  lcd.backlight();
  sensors.begin();
  lcd.setCursor(0, 0);
  lcd.print("Digital Thermometer");
  delay(2000);
  lcd.clear();
}

void loop() {
  sensors.requestTemperatures();
  float temperature = sensors.getTempCByIndex(0);

  lcd.setCursor(0, 0);
  lcd.print("Temp: ");
  lcd.print(temperature);
  lcd.print(" C");

  delay(1000);
}
Adding IoT with ESP-01 and Blynk
First, install the Blynk library from the Arduino IDE Library Manager. Then, update your code:
#define BLYNK_TEMPLATE_ID "YourTemplateID"
#define BLYNK_DEVICE_NAME "YourDeviceName"
#define BLYNK_AUTH_TOKEN "YourAuthToken"

#include <OneWire.h>
#include <DallasTemperature.h>
#include <ESP8266WiFi.h>
#include <BlynkSimpleEsp8266.h>

char auth[] = BLYNK_AUTH_TOKEN;
char ssid[] = "YourWiFiSSID";
char pass[] = "YourWiFiPassword";

#define ONE_WIRE_BUS 2
OneWire oneWire(ONE_WIRE_BUS);
DallasTemperature sensors(&oneWire);

BlynkTimer timer;

void sendTemperature() {
  sensors.requestTemperatures();
  float temperature = sensors.getTempCByIndex(0);
  Blynk.virtualWrite(V1, temperature);
}

void setup() {
  Blynk.begin(auth, ssid, pass);
  sensors.begin();
  timer.setInterval(1000L, sendTemperature);
}

void loop() {
  Blynk.run();
  timer.run();
}
How It Works
- Local Temperature Display:
- The DS18B20 measures the room’s temperature.
- The Arduino processes this data and sends it to the LCD.
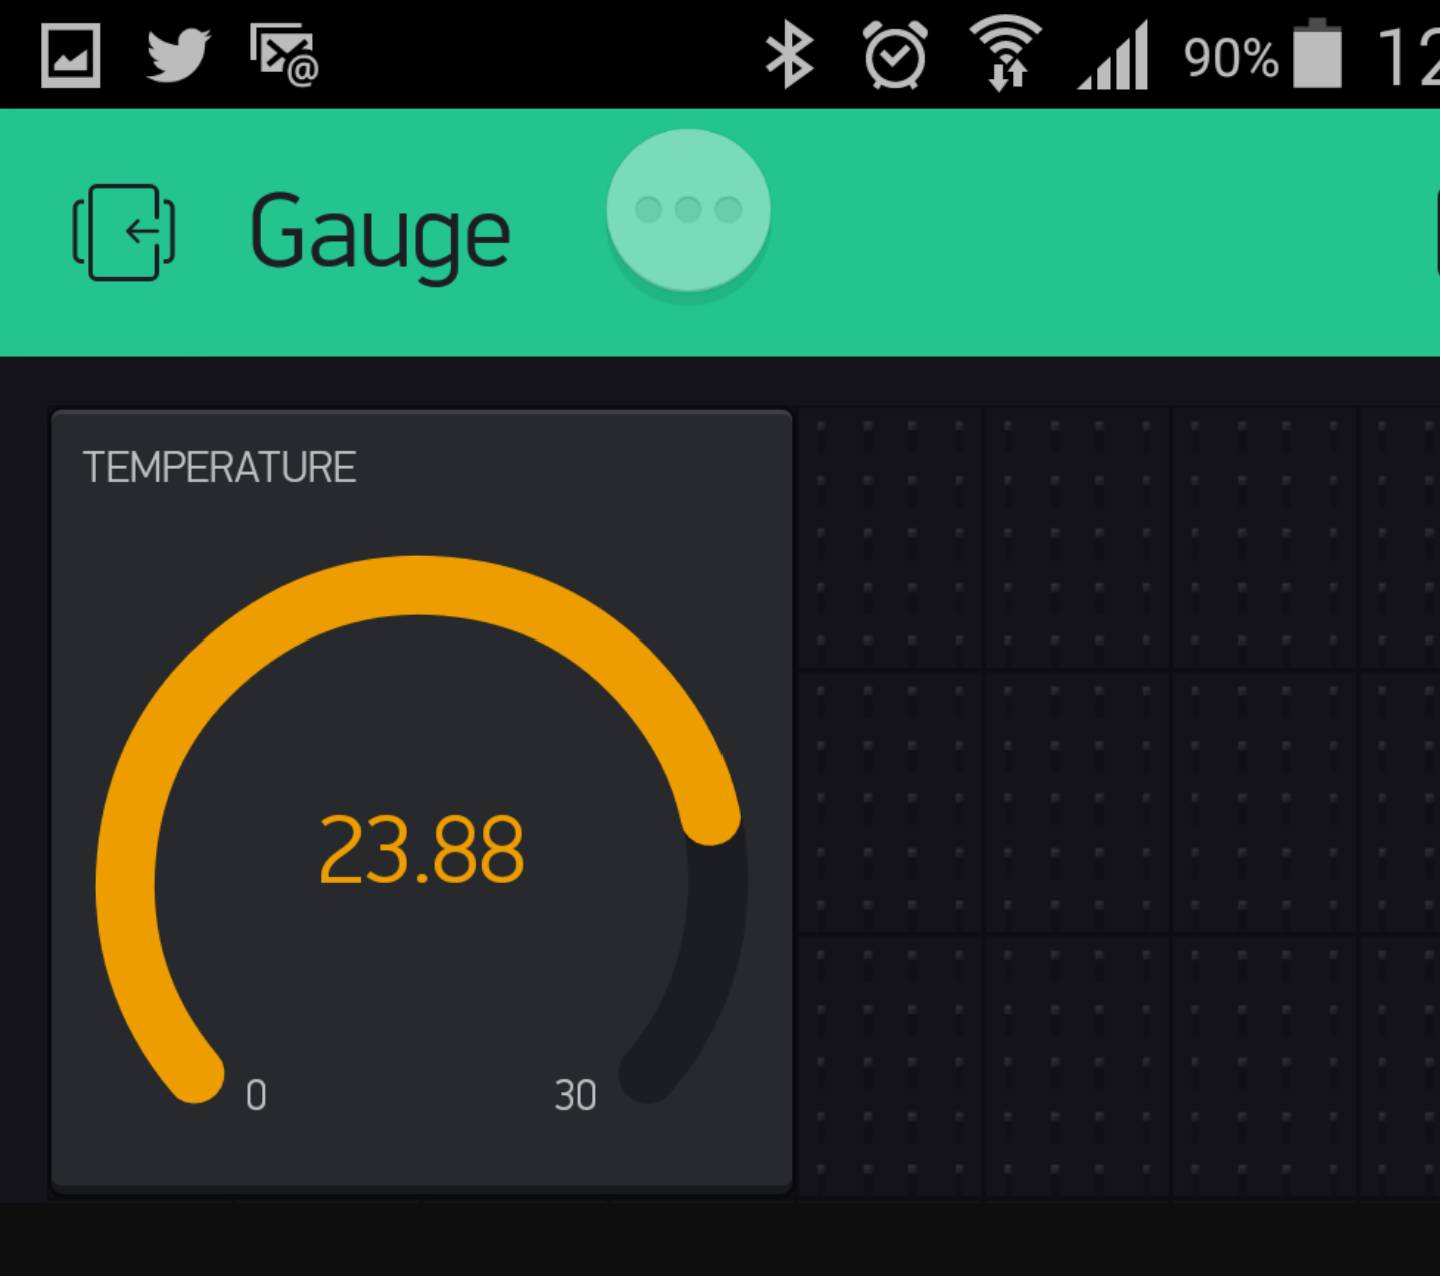
- Remote Monitoring via Blynk:
- The ESP-01 connects to your Wi-Fi network.
- Temperature readings are sent to the Blynk app for real-time monitoring.
Debugging Tips
- Double-check all connections, especially power and data lines.
- Use the Arduino Serial Monitor to troubleshoot sensor readings.
- Ensure the ESP-01 is configured correctly with your network credentials.
Advantages of This Project
- Easy to Build: Even beginners can follow along.
- Scalable: Add more sensors or features as needed.
- Practical: Useful for monitoring room temperature in real-time.
Potential Challenges
- Power Supply: Ensure a stable power source for the ESP-01.
- Sensor Placement: Avoid placing the DS18B20 near heat sources for accurate readings.
- Wi-Fi Connectivity: Make sure your router’s signal is strong and stable.
Applications of a Digital Thermometer
- Home Automation: Monitor and regulate indoor temperatures.
- Greenhouses: Keep track of optimal growing conditions.
- Server Rooms: Prevent overheating of critical equipment.
Fun Add-Ons
- Humidity Sensor: Add a DHT11 or DHT22 for combined temperature and humidity monitoring.
- Buzzer Alarm: Set a temperature threshold to trigger an alert.
- Graphical Interface: Display temperature trends on the Blynk app.
Conclusion
Congratulations! You’ve just created a digital thermometer that not only displays temperature on an LCD screen but also integrates IoT for remote monitoring. This project is a fantastic way to combine electronics, coding, and creativity. Now, go ahead and experiment with more features. The possibilities are endless!
FAQs
1. Can I use a different microcontroller? Yes, you can use other boards like the ESP32 or NodeMCU, which have built-in Wi-Fi.
2. What’s the accuracy of the DS18B20 sensor? The DS18B20 has an accuracy of ±0.5°C in the range of -10°C to +85°C.
3. How do I power the ESP-01 safely? Use a 3.3V regulator or a dedicated power module to avoid damage.
4. Can I display the temperature in Fahrenheit? Absolutely! Use a simple conversion formula in your code: F = (C * 9/5) + 32.
5. Is the Blynk app free to use? Blynk offers both free and paid plans. The free version is sufficient for basic projects like this one.